Snippset Feed
To display datetimes in the user's local timezone while preserving backend UTC storage, you can use JavaScript's built-in timezone offset support:
const utcDate = "2025-05-27T20:03:00Z"; const localDisplay = new Date(utcDate).toLocaleString(); // → "5/27/2025, 10:03 PM" (depending on user's locale)
This gives users a familiar and correctly adjusted view of time. For a consistent format, Intl.DateTimeFormat can be used.
ASP.NET Core with System.Text.Json handles ISO 8601 UTC strings automatically when binding to DateTime properties. Ensure you're not converting to UTC again if the incoming data already ends with Z.
Best Practices:
[JsonPropertyName("created")] public DateTime Created { get; set; } // Will be parsed as UTC if ends in "Z"
If needed, ensure correct serialization:
private readonly JsonSerializerOptions _jsonOptions = new() { PropertyNamingPolicy = JsonNamingPolicy.CamelCase, DefaultIgnoreCondition = JsonIgnoreCondition.WhenWritingNull, Converters = { new UtcDateTimeConverter() } };
Custom converter (if required):
public class UtcDateTimeConverter : JsonConverter<DateTime> { public override DateTime Read(ref Utf8JsonReader reader, Type typeToConvert, JsonSerializerOptions options) => DateTime.SpecifyKind(reader.GetDateTime(), DateTimeKind.Utc); public override void Write(Utf8JsonWriter writer, DateTime value, JsonSerializerOptions options) => writer.WriteStringValue(value.ToUniversalTime().ToString("yyyy-MM-ddTHH:mm:ss.fffZ")); }
When a user selects a datetime in a <input type="datetime-local">, the returned value (e.g., "2025-05-27T22:03") is in local time. To maintain UTC consistency on the backend, this must be converted to UTC.
Implementation:
const handleChange = (e) => { const local = new Date(e.target.value); // local time const utc = local.toISOString(); // UTC string for API setPost({ ...post, created: utc }); };
This ensures accurate time data regardless of the user's timezone.
To populate an <input type="datetime-local"> in React, you must convert your UTC string into a local time string formatted as "yyyy-MM-ddTHH:mm" — the only format the input accepts.
Implementation:
function toDatetimeLocalValue(dateInput) { const date = new Date(dateInput); const pad = (n) => n.toString().padStart(2, '0'); return `${date.getFullYear()}-${pad(date.getMonth() + 1)}-${pad(date.getDate())}T${pad(date.getHours())}:${pad(date.getMinutes())}`; }
Use this function when binding input values in forms to ensure users see time in their own timezone.
When working with frontend frameworks like React and backend APIs such as ASP.NET Core, ensuring consistent and accurate DateTime handling across timezones is essential — especially when dealing with user input via <input type="datetime-local"> and when storing timestamps like created, modified, and published in UTC in a database.
This Snippset explores a practical and professional strategy for:
Accepting and formatting user input in local time
Converting local times to UTC before sending to the server
Storing and retrieving UTC in ASP.NET Core
Formatting and displaying local time correctly on the frontend
All examples assume the use of modern JSON APIs with ISO 8601 strings ("2025-05-27T20:03:00Z") and an object-based form model in React.
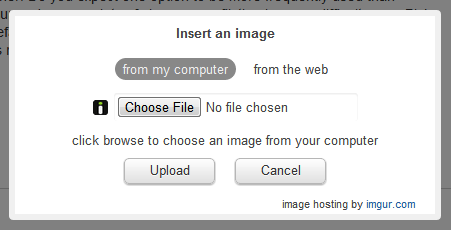
Options for designing a user interface (UI) that allows users to either enter a URL or upload:
- Inline Dual Buttons: Presenting two clearly labeled buttons side by side—such as "Upload from Computer" and "Add from URL"—allows users to immediately recognize and choose their preferred method without navigating through additional dialogs or radio buttons. This approach offers equal visibility and accessibility to both options.
- Use of Tabs or Toggle Options: Implementing tabs or toggle switches to separate the two input methods can help users focus on one task at a time. This design reduces cognitive load by displaying only the relevant input fields based on the user's selection.
- Prioritizing Common Actions: If user data indicates a predominant preference for one method over the other, designers might consider making the more frequently used option the default view while still providing easy access to the alternative method. This strategy streamlines the user experience by aligning with common usage patterns.
Resources:
The best-selling video game in the world, Minecraft, began as the passion project of a single individual who single-handedly created much of the game's foundation. This video delves into the fascinating story of its early beginnings.

Minecraft is a sandbox video game developed by Mojang Studios that allows players to explore, build, and survive in a blocky, procedurally generated 3D world. Launched in 2011, it has become one of the best-selling games of all time. Players can gather resources, craft tools, and construct structures, all while facing off against monsters or collaborating with others in creative or survival modes. With endless possibilities for creativity and adventure, Minecraft has captivated millions around the world across all ages.
To disable all biometric devices, including facial recognition hardware, follow these steps:
Right-click the Start button and select Device Manager.
Expand the Biometric Devices section.
Right-click on your biometric device (e.g., IR camera) and choose Disable device.
Confirm the action when prompted.
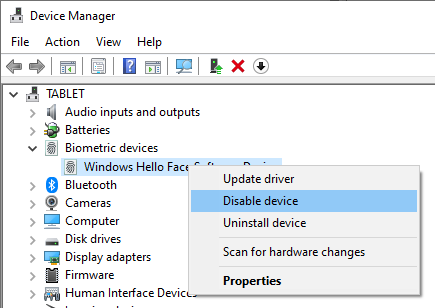
Disabling the biometric device prevents the system from using any biometric authentication methods.
Facial recognition, offered through Windows Hello, is convenient for signing in to your Windows device. However, there are scenarios where disabling this feature is preferable, such as privacy concerns, device sharing, or technical issues. This guide outlines three methods to disable facial recognition on Windows 10 and 11.
- .NET
- Agile
- AI
- ASP.NET Core
- Azure
- C#
- Cloud Computing
- CSS
- EF Core
- HTML
- JavaScript
- Microsoft Entra
- PowerShell
- Quotes
- React
- Security
- Software Development
- SQL References
- Technologies
- Testing
- Visual Studio
- Windows