Software Development
A read-only editor is useful when users should view a template without changing its main structure. But sometimes, selected areas still need to remain editable—for example, a table where users enter prices, dates, or project details.
TinyMCE can support this approach by combining HTML’s contenteditable attribute with predefined CSS classes.
The main idea
Keep the editor content protected, but assign a special class such as editablecontent to tables that users are allowed to modify. Template authors can select this class directly from the TinyMCE table properties dialog.
The table_class_list option defines which table classes appear in that dialog:
tinymce.init({
  selector: "textarea",
  plugins: "table",
  menubar: "table",
  toolbar: "table",

  table_class_list: [
    { title: "None", value: "" },
    { title: "Editable Table", value: "editablecontent" },
    { title: "Other Table Type", value: "other_table_class" }
  ]
});
When the template author chooses Editable Table, TinyMCE adds the following class to the table:
<table class="editablecontent">Your application can then detect this class and make only that table editable.
Why use predefined classes?
- Template authors do not need to edit HTML.
- Editable areas are clearly controlled.
- The same class can be reused across many templates.
- Other table options, such as border styles, can be added to the same list.
For larger configurations, TinyMCE also supports nested class menus. This helps organize editable states, visual styles, and other table types into separate groups.
GitHub Copilot becomes much more effective when it is customized for your project. Rather than relying on one-off prompts, you can combine several reusable building blocks that provide context, standardize outputs, automate repetitive work, and create focused AI interactions.
A well-organized customization strategy typically includes the building blocks:
- Instructions: Define project-wide coding standards, architecture, documentation, and development guidelines.
- Custom Instructions: Add folder- or task-specific rules that extend the general instructions for a particular part of the repository.
- Templates: Provide reusable file structures with placeholders for creating consistent documents and source files.
- Prompts: Automate repetitive, multi-step workflows such as creating new features, documentation, or assignments.
- Chat Modes: Create specialized AI conversations for brainstorming, planning, reviews, or other focused tasks.
How They Work Together
A typical workflow might look like this:
- Instructions provide the overall project context.
- Custom Instructions add rules for a specific area of the repository.
- Templates define the structure of the files to generate.
- Prompts execute the workflow and create or update the required files.
- Chat Modes support focused discussions before or during implementation.
Using these building blocks together makes Copilot more predictable, produces more consistent results, and reduces the need to repeatedly explain your project's standards and workflows.
Instead of helping you one prompt at a time, GitHub Copilot Coding Agent works like an autonomous developer. You assign it a GitHub issue, and it independently implements the requested changes while you continue working on other tasks.
How does it work?
- Assign a GitHub issue to Copilot.
- The Coding Agent creates its own branch and starts a secure GitHub Actions environment.
- It analyzes the repository, writes the required code, runs tests and validation, and commits its progress.
- When finished, it opens a draft pull request containing the proposed solution, implementation details, and a summary of the changes.
- You review the code, provide feedback if needed, and decide whether to merge the pull request.
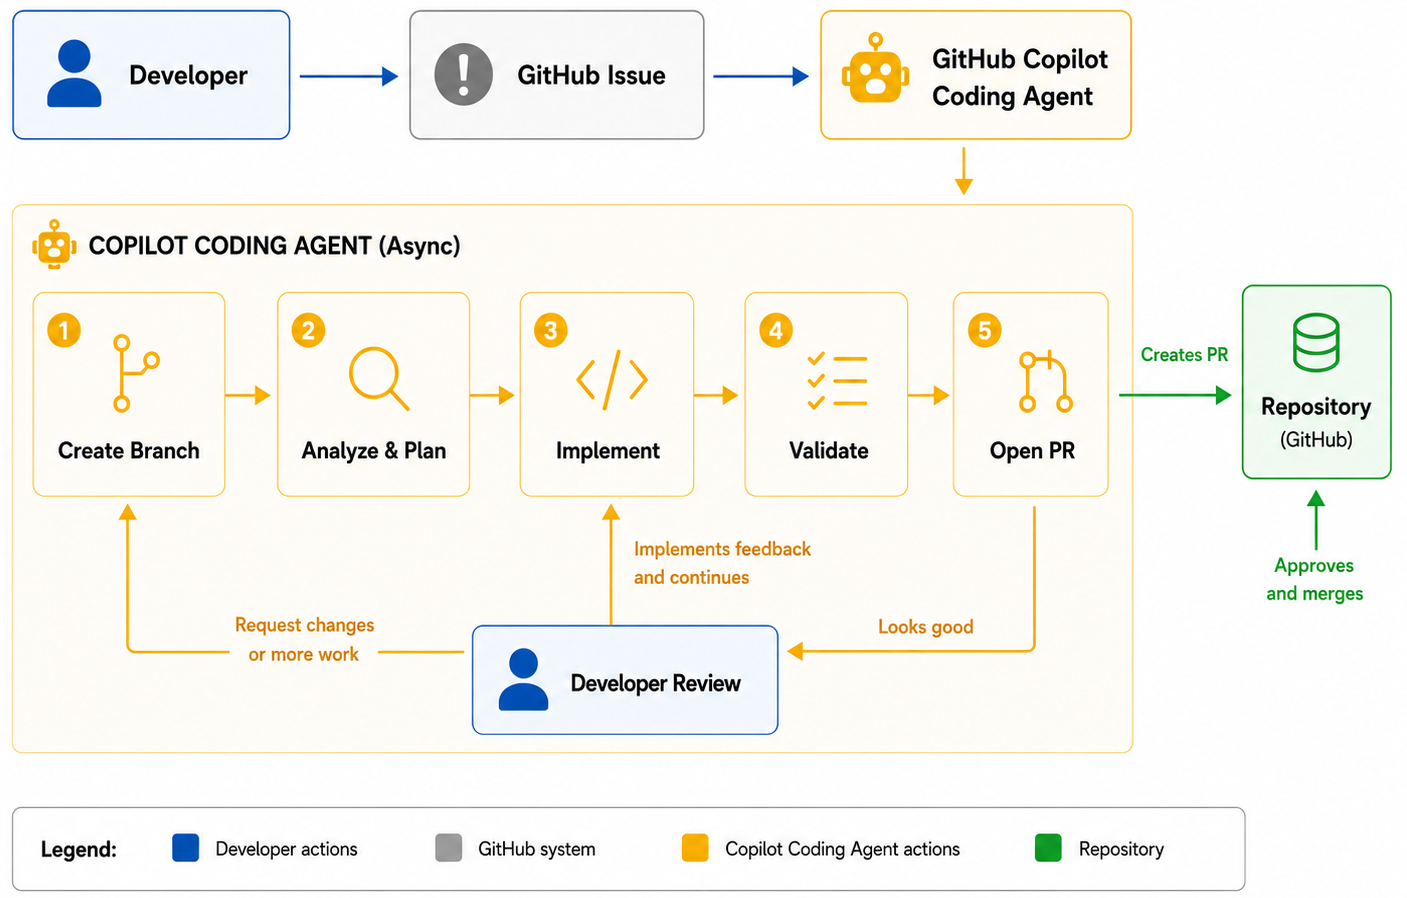
What can it do?
The Coding Agent is well suited for:
- Implementing new features
- Fixing bugs
- Refactoring existing code
- Adding or updating tests
- Improving documentation
- Performing routine maintenance tasks
Why use it?
Unlike Agent Mode, which works interactively inside your IDE, the Coding Agent runs asynchronously on GitHub. It can continue working in the background while you focus on other development tasks. Because every change is delivered through a standard pull request, your existing review process, branch protections, and approval workflow remain unchanged. When combined with Model Context Protocol (MCP), the Coding Agent can also use project-specific tools and external data sources to produce more accurate, context-aware solutions.
GitHub Copilot can do more than answer general questions. With custom chat modes, you can create specialized AI experiences that guide conversations toward a specific goal. Rather than relying on a generic assistant, a chat mode defines how Copilot should respond, what tools it may use, and which rules it should follow. This makes conversations more consistent and helps the AI stay focused on the task at hand.
Chat modes are ideal for activities such as brainstorming new features, reviewing architecture, planning documentation, or coaching developers. Instead of repeatedly explaining how you want Copilot to behave, you define the behavior once and reuse it whenever needed.
How to create a custom chat mode
- Create a
.github/chatmodesdirectory if it does not already exist. - Add a new file ending with
.chatmode.md. - Define the chat mode's metadata, including its description and available tools.
- Describe the response structure you expect Copilot to follow.
- Add clear rules that limit the scope and style of the conversation.
- Save the file and select the chat mode from the Copilot Chat interface.
Example
---
description: Brainstorm ideas for new learning assignments
tools:
  - codebase
---

# Response Format

For every response:

1. Summarize the current project or codebase.
2. Suggest 3–5 new ideas.
3. Explain why each idea is valuable.
4. End with one follow-up question.

# Rules

- Keep responses concise.
- Focus on ideas, not implementation details.
- Build on existing project content.
- Always finish with a question.
Once the chat mode is available, every conversation follows the same structure and objectives. This produces more predictable responses and reduces the need to rewrite prompts for recurring activities.
Best practices
- Create one chat mode for each recurring role or workflow.
- Define a clear response format with consistent sections.
- Limit the scope so Copilot stays focused.
- Keep rules short and unambiguous.
- Combine chat modes with instruction files, templates, and reusable prompts for an even more consistent AI-assisted workflow.
Templates are a simple way to standardize files that are created repeatedly. Instead of asking GitHub Copilot to generate content from scratch each time, you provide a predefined file containing the desired structure, headings, placeholders, and optional example content. Copilot can then use this template as the starting point, ensuring that every generated file follows the same layout and includes all required sections.
Templates are especially useful for documentation, assignments, design documents, issue reports, meeting notes, tutorials, and many other project artifacts. By combining templates with reusable prompts and instruction files, you can automate repetitive workflows while maintaining consistent quality across your repository.
How to create a template
- Create a folder to store reusable templates (for example,
templates). - Create a Markdown file that contains the standard structure.
- Replace project-specific content with placeholders.
- Reference the template from a reusable prompt so Copilot knows when to use it.
- Update the template whenever your standard format changes.
Example
# assignment-template.md

# {{Assignment Title}}

## Learning Objectives

- Objective 1
- Objective 2

## Prerequisites

- Requirement 1

## Instructions

1. Step one
2. Step two

## Starter Code

```python
# Add your solution here
Summary
Briefly describe what the learner should have accomplished.
A reusable prompt can then instruct Copilot to copy this template, replace the placeholders with the user's input, generate any optional starter code, and update related project files automatically.
Best practices
- Keep templates focused on structure rather than detailed content.
- Use clear placeholders that are easy to identify and replace.
- Create separate templates for different document types.
- Review templates regularly to keep them aligned with current project standards.
- Let prompts perform the customization while templates provide the consistent foundation.
Many AI coding assistants only know what is included in your prompt or current file. Model Context Protocol (MCP) extends GitHub Copilot by giving it secure access to external tools and project-specific information, making its responses far more relevant and accurate.
What is MCP?
MCP is an open standard that connects AI assistants with repositories, documentation, APIs, databases, issue trackers, CI/CD systems, and other development tools. Instead of manually copying information into a prompt, Copilot can retrieve the context it needs automatically.
How does it work?
- An MCP server exposes tools and data through a standard interface.
- GitHub Copilot discovers these tools and can call them when needed.
- The retrieved information is added to the AI's context before generating a response.
- Developers remain in control and can review or approve actions before they are executed.
What can Copilot do with MCP?
With the appropriate MCP servers, Copilot can:
- Read GitHub issues and pull requests
- Search documentation and codebases
- Query external APIs or internal knowledge bases
- Access CI/CD logs and monitoring data
- Integrate with tools such as Slack, Figma, or custom business systems
By combining MCP with Agent Mode or the Coding Agent, GitHub Copilot becomes a context-aware development partner that can understand your project, use external tools, and automate complex development workflows while keeping developers in control.
Many development activities involve repeating the same sequence of actions. Prompt files allow you to package those steps into reusable workflows that can be launched directly from Copilot Chat.
Instead of writing a long prompt every time, you simply execute the reusable prompt and let Copilot perform the workflow.
What prompt files can do
A reusable prompt can:
- Ask for missing information
- Create folders
- Generate multiple files
- Apply templates
- Update configuration files
- Reference instruction files
How to create a reusable prompt
- Create a
.github/promptsfolder. - Create a file ending with
.prompt.md. - Describe the workflow as numbered steps.
- Reference templates or instruction files when appropriate.
- Save the file.
Example
# .github/prompts/new-assignment.prompt.md

Create a new assignment.

1. Ask for the assignment topic if none is provided.
2. Create a new folder in `/assignments`.
3. Generate `assignment.md`.
4. Add starter code if required.
5. Update `config.json`.
6. Verify that all generated files are linked correctly.
You can then invoke it from Copilot Chat using:
/new-assignmentIf the required information is missing, Copilot asks follow-up questions before completing the remaining steps.
Best practices
- Design prompts around complete workflows.
- Break complex tasks into numbered steps.
- Reference instruction files instead of repeating guidance.
- Keep prompts reusable rather than project-specific.
- Test prompts regularly as your project evolves.
Different folders often require different types of guidance. Documentation, tests, templates, and source code rarely follow identical rules. Custom instruction files allow you to define folder-specific behavior so Copilot adapts automatically depending on where you are working.
When to use custom instructions
Examples include:
- Documentation folders
- Assignment content
- Test projects
- Infrastructure scripts
- Sample applications
How to create custom instructions
- Create an instruction file in the appropriate location.
- Describe the expected structure and formatting.
- Specify any required sections.
- Define optional content such as starter code or examples.
Example
# assignments.instructions.md

When creating a new assignment:

- Start with a title.
- Add learning objectives.
- Include prerequisites.
- Add step-by-step instructions.
- Finish with review questions.
- Provide starter code when applicable.
Whenever Copilot generates content for assignments, it can follow these requirements automatically.
Best practices
- Keep each instruction focused on one purpose.
- Store instructions close to the content they describe.
- Update them whenever the folder structure changes.
- Avoid duplicating global project rules.
GitHub Copilot has evolved from an AI code completion tool into a comprehensive development assistant. Today it supports the entire software development lifecycle, helping developers write code, review changes, automate tasks, and rapidly prototype new ideas.
Writing Code
- Code Completion (2021) – Provides inline AI code suggestions while you type. Best for: Faster coding and reducing repetitive work.
- Copilot Chat (2023) – Answers coding questions, explains code, generates tests, and assists with debugging. Best for: Learning and problem solving.
- Copilot Edits (2024) – Applies coordinated changes across multiple files from a single prompt. Best for: Refactoring and implementing features.
Code Quality
- Code Review (2024) – Detects bugs, performance issues, and improvement opportunities. Best for: Improving code before human review.
- Pull Request Summaries (2024) – Automatically creates clear summaries of code changes. Best for: Better collaboration and documentation.
AI Agents
- Agent Mode (2025) – Plans, edits, tests, and iterates directly within your IDE. Best for: Interactive, multi-step development tasks.
- Coding Agent (2025) – Works asynchronously on GitHub by completing issues and opening pull requests. Best for: Automating routine development work.
Advanced AI
- Multi-Model Support (2024) – Lets you switch between different AI models to suit each task.
- Model Context Protocol (MCP) (2024) – Connects Copilot to repositories, documentation, APIs, and external tools, enabling richer context and more accurate AI assistance.
- GitHub Spark (2025) – Generates interactive application prototypes from natural-language prompts. Best for: Quickly validating ideas and creating proof-of-concepts.
Together, these capabilities transform GitHub Copilot from a coding assistant into an AI-powered development platform that helps developers build software faster, with greater confidence and less repetitive work.
AI-generated code is most valuable when it follows your project's conventions. Instead of repeating coding rules in every prompt, you can store them in an instruction file. GitHub Copilot automatically uses these instructions when generating code, helping produce more consistent results across the repository.
What instruction files are
Instruction files define general project guidance, such as:
- Coding style
- Naming conventions
- Architecture preferences
- Testing requirements
- Documentation standards
Unlike prompts, instruction files do not perform actions. They simply provide persistent context for Copilot.
How to create an instruction file
- Create a
.github/instructionsfolder if it does not already exist. - Create a Markdown instruction file.
- Add the development rules you want Copilot to follow.
- Commit the file with your repository so the whole team benefits.
Example
# .github/instructions/coding.instructions.md

## Coding Standards

- Use C# 13 features where appropriate.
- Prefer dependency injection.
- Write XML documentation for public APIs.
- Use async/await for I/O operations.
- Add unit tests for new functionality.
Once saved, Copilot can use these guidelines whenever it generates code for your project.
Best practices
- Keep instructions concise.
- Separate unrelated topics into multiple files.
- Review them as your project evolves.
- Avoid conflicting rules.
GitHub Copilot has evolved from an AI code completion tool into a powerful development assistant. With the introduction of AI development agents, Copilot can now help automate entire development workflows rather than simply suggesting individual lines of code.
Instead of acting as an autocomplete tool, AI agents understand high-level objectives, plan the required steps, modify multiple files, execute tests, review results, and assist with completing development tasks. Developers remain in control, reviewing and approving changes while Copilot handles much of the repetitive implementation work.
What GitHub Copilot Can Do
Modern GitHub Copilot agents can assist with tasks such as:
- Implementing new features
- Fixing bugs and refactoring code
- Writing and improving tests
- Generating or updating documentation
- Reviewing code and suggesting improvements
- Creating commits and pull requests
- Building application prototypes from natural language
Depending on the workflow, these tasks can be performed directly inside the IDE or autonomously in GitHub repositories.
Better Results Through Context
GitHub Copilot becomes significantly more effective when it understands your project. By using repository context, documentation, coding standards, issues, pull requests, and external tools, it can generate more accurate and relevant solutions that fit your existing codebase.
Best Practices
To get the best results, provide clear objectives, supply sufficient context, and always review generated changes before accepting them. Think of GitHub Copilot as a collaborative teammate that accelerates development while leaving architecture, security, and business decisions to the developer.
AI development agents represent the next step in GitHub Copilot's evolution, enabling developers to spend less time on repetitive coding and more time designing, solving problems, and delivering high-quality software.
A modern website should be more than a digital business card. For businesses, the real value often comes not from better design, but from solving concrete problems and reducing everyday work.
From website to digital tool
Instead of starting with layouts, colors, or technical features, ask a different question: What does the business actually want to achieve?
For example:
- generate more enquiries or sales
- simplify appointment management
- automatically remind customers about follow-ups
- automate recurring tasks
- manage information and documents centrally
- create a more personalized customer experience
This can turn a traditional website into a custom digital system with features such as appointment scheduling, customer portals, reminders, CRM functions, or automated workflows.
For smaller businesses in particular, focused solutions can be valuable because they provide exactly the functionality needed and can fit existing processes.
The key shift in perspective: Don’t ask “How can we build a better website?” Ask “Which problem can we solve better digitally?”
Starting a new repository should be simple—but sometimes GitLab surprises you with errors when pushing your first branch. One common issue happens when trying to create a protected branch (like dev) directly from a local repository. The result? A rejected push and a confusing message.
Here’s the key idea:
GitLab does not allow protected branches to be created “from nothing.”
They must be based on a branch or commit that already exists on the server.
Many developers used to start like this:
git checkout -b dev
git commit -m "Initial commit" --allow-empty
git push -u origin dev
This worked before, but now GitLab blocks it if dev is protected. The problem is not the empty commit—it’s that the branch has no existing base on the remote.
The correct approach is to create a base branch first:
git checkout -b main
git commit -m "Initial commit" --allow-empty
git push -u origin main

git checkout -b dev
git push -u origin dev
Now dev is created from an existing branch (main), and GitLab accepts it.
Alternative solutions:
- Temporarily remove protection on
dev - Create the first branch using the GitLab UI
Takeaway:
Always create at least one branch on the remote before pushing protected branches. This small change avoids errors and keeps your workflow smooth.
Code highlighting improves readability and helps readers understand examples faster. When using TinyMCE together with Highlight.js, many developers notice that JavaScript highlighting works, but JSON or plain text does not. This problem is common—and luckily easy to fix once you know where to look.
The first step is using the correct language identifiers in TinyMCE. The values defined in codesample_languages must match the language names that Highlight.js understands. JavaScript works because it is included by default, but JSON and plain text need special attention.
TinyMCE configuration
codesample_languages: [
  { text: 'Plain Text', value: 'plaintext' },
  { text: 'JSON', value: 'json' },
  { text: 'JavaScript', value: 'javascript' }
]
Next, make sure Highlight.js actually loads the required languages. Some builds do not include JSON or plain text automatically, so they must be added manually.
Highlight.js setup
<link rel="stylesheet"
  href="https://cdnjs.cloudflare.com/ajax/libs/highlight.js/11.5.1/styles/vs.min.css">

<script src="https://cdnjs.cloudflare.com/ajax/libs/highlight.js/11.5.1/highlight.min.js"></script>
<script src="https://cdnjs.cloudflare.com/ajax/libs/highlight.js/11.5.1/languages/json.min.js"></script>
<script src="https://cdnjs.cloudflare.com/ajax/libs/highlight.js/11.5.1/languages/plaintext.min.js"></script>

<script>
  hljs.highlightAll();
</script>
Finally, remember that TinyMCE content is often added dynamically. Highlight.js only runs once by default, so new code blocks must be highlighted again after rendering.
Re-run highlighting
document.querySelectorAll('pre code')
  .forEach(el => hljs.highlightElement(el));
With the correct language values, loaded modules, and proper initialization, JSON and plain text code blocks will highlight reliably and look consistent across your site.
Sometimes one color palette just isn’t enough. Text colors usually need to be dark and readable, while highlight colors should be soft and subtle. By default, TinyMCE uses the same color palette for both—but with a small customization, you can fully separate them.
By replacing the built-in color buttons with custom toolbar buttons, you gain complete control over which colors are available for text and which are used for background highlights. This approach is ideal for platforms that care about accessibility, readability, and consistent visual design.
What this approach enables:
- Dark, high-contrast colors for text
- Soft, low-saturation colors for highlights
- Full control over labels, order, and UX
- Clear separation of purpose for each color picker
How it works:
You register two custom menu buttons—one for text color and one for background color—and apply styles manually using editor commands.
tinymce.init({
  selector: '#editor',
  toolbar: 'textcolorpicker highlightpicker',
  setup: (editor) => {

    editor.ui.registry.addMenuButton('textcolorpicker', {
      text: 'Text Color',
      fetch: (callback) => {
        callback([
          { type: 'choiceitem', text: 'Black', value: '#000000' },
          { type: 'choiceitem', text: 'Blue', value: '#2563EB' },
          { type: 'choiceitem', text: 'Red', value: '#DC2626' }
        ]);
      },
      onItemAction: (api, value) => {
        editor.execCommand('ForeColor', false, value);
      }
    });

    editor.ui.registry.addMenuButton('highlightpicker', {
      text: 'Highlight',
      fetch: (callback) => {
        callback([
          { type: 'choiceitem', text: 'Yellow', value: '#FEF08A' },
          { type: 'choiceitem', text: 'Light Blue', value: '#DBEAFE' },
          { type: 'choiceitem', text: 'Light Green', value: '#DCFCE7' }
        ]);
      },
      onItemAction: (api, value) => {
        editor.execCommand('HiliteColor', false, value);
      }
    });

  }
});
When to use this approach:
- Shared or public content feeds
- Editorial or knowledge platforms
- Accessibility-focused designs
- Strict brand or design systems
Why it’s worth it:
Although this requires a bit more setup, it’s currently the only reliable way to enforce different color rules for text and highlights in TinyMCE—without confusing users or sacrificing flexibility.
iving users unlimited color options can quickly lead to inconsistent or hard-to-read content. TinyMCE allows you to define a custom color palette, so users stay within visual guidelines while still having creative freedom.
This is especially useful for platforms with shared feeds, collaborative writing, or brand-focused content.
Benefits of a custom color palette:
- Consistent visual style
- Better readability
- Alignment with brand colors
- Fewer design mistakes
How to define custom colors:
Use color_map to control which colors appear in the picker.
tinymce.init({
  selector: '#editor',
  plugins: 'lists link code',
  toolbar: 'undo redo | bold italic underline | forecolor backcolor | code',

  color_map: [
    '000000', 'Black',
    'FFFFFF', 'White',
    '1E293B', 'Dark Blue',
    '2563EB', 'Primary Blue',
    '16A34A', 'Green',
    'F59E0B', 'Orange',
    'DC2626', 'Red'
  ],

  color_cols: 4
});
Users will now see only these predefined colors, making content look more cohesive across the platform.
When to use this approach:
- Shared or public content feeds
- Brand-driven platforms
- Editorial or knowledge-based sites
Want to give users more visual control over their content without extra complexity? TinyMCE already includes built-in tools for changing text color and background (highlight) color—you just need to enable them.
These tools are ideal for short articles, notes, or mini-blogs where users want to emphasize key ideas or improve readability.
What this enables:
- Text color selection
- Background highlight color
- A user-friendly color picker UI
- No custom plugins or UI needed
How to enable it:
Add forecolor and backcolor to the toolbar configuration.
tinymce.init({
  selector: '#editor',
  plugins: 'lists link code',
  toolbar: 'undo redo | bold italic underline | forecolor backcolor | code'
});
That’s all. TinyMCE automatically provides a color picker that works well for beginners and advanced users alike.
Why this works well:
- Quick to implement
- Low maintenance
- Improves content clarity and expression
Images created with rich-text editors like TinyMCE often include width and height attributes. These values are useful because they describe how the image should appear. However, many layouts use global CSS rules like width: 100%, which silently override those attributes. The result is stretched images or broken proportions.
A better approach is to let both systems work together:
- If an image has a defined width, respect it.
- If it does not, make it responsive.
- Always keep the original aspect ratio.
The key idea is simple. CSS should only force full width on images that do not define their own size. At the same time, height should never be fixed. Let the browser calculate it automatically.
This approach is safe, predictable, and works well for content feeds, articles, and mixed image sizes.
Example HTML
Example CSS
Why this works
- Images with
widthandheightkeep their intended size - Images without dimensions become responsive
height: autopreserves the natural aspect ratio- No cropping or distortion occurs
Avoid using object-fit: cover for normal content images, as it may cut off important parts. This solution keeps layouts clean, readable, and friendly for all screen sizes.
Before using a custom dimension, it helps to know what keys actually exist in your data.
View Raw Custom Dimensions
Start by inspecting a few records:
traces
| take 5
| project customDimensions
This shows the full dynamic object so you can see available keys and example values.
List All Keys Found in the Data
traces
| summarize by tostring(bag_keys(customDimensions))
This returns a list of keys across your dataset.
Correct Way to Access a Key
tostring(customDimensions["UserId"])Avoid this pattern — it does not work:
customDimensions.UserIdTips
- Key names are case-sensitive.
- Some records may not contain the same keys.
- Always test with a small sample before building complex queries.
These discovery steps prevent mistakes and make your queries more reliable from the start.
Once a custom dimension is extracted, you can filter and analyze it like any normal column.
Filter by Text Value
requests
| where tostring(customDimensions["Region"]) == "EU"
This keeps only rows where the Region custom dimension matches the value.
Filter by Numeric Value
If the value represents a number, convert it first:
requests
| extend DurationMs = todouble(customDimensions["DurationMs"])
| where DurationMs > 1000
Reuse Extracted Values
Using extend lets you reuse the value multiple times:
traces
| extend UserId = tostring(customDimensions["UserId"])
| where UserId != ""
| summarize Count = count() by UserId
Tips
- Use
extendwhen the value appears more than once in your query. - Always convert to the correct type before filtering.
- Avoid comparing raw dynamic values directly.
These patterns help you build fast, readable queries that work reliably across dashboards and alerts.
Selecting a custom dimension means extracting a value from the dynamic field and showing it as a normal column.
Basic Example
If your logs contain a custom dimension called UserId, use this query:
What this does:
- Reads the value using square brackets.
- Converts it to a string.
- Creates a new column named UserId.
You can select multiple custom dimensions in the same query:
Tips
- Always use
tostring()unless you know the value is numeric or boolean. - Rename the extracted value to keep your results readable.
- Use
projectto control exactly what columns appear in the output.
This pattern is ideal for building reports or exporting data because it turns hidden metadata into visible columns that anyone can understand.
When working with software versions like 1.0.2 or 3.45.12-SNAPSHOT, it's common to use regular expressions (regex) to validate or extract these patterns. This Snipp shows you a simple and effective way to match such version numbers using regex.
What We Want to Match:
1.0.23.32.343.45.12-SNAPSHOT
These are typical semantic version numbers and may optionally include a suffix like -SNAPSHOT.
The Regex:
^\d+\.\d+\.\d+(?:-SNAPSHOT)?$How It Works:
^— Start of the string\d+— One or more digits (major, minor, patch)\.— Dots separating version parts(?:-SNAPSHOT)?— Optional suffix (non-capturing group)$— End of the string
Matches:
- ✔️
1.0.2 - ✔️
3.32.34 - ✔️
3.45.12-SNAPSHOT
Not Matched:
- ❌
1.0 - ❌
3.2.4-RELEASE - ❌
a.b.c
This pattern is useful when validating software version inputs in forms, logs, or build scripts.
Open source software (OSS) has evolved from a niche hobby to the backbone of mission-critical systems—from cloud infrastructure to AI platforms and government services. Today, embracing OSS isn’t optional; it’s a strategic choice offering several key benefits:
- Speed & Flexibility: Without vendor lock-in or license fees, teams can rapidly prototype, customize tools to fit needs, and iterate freely.
- Security & Quality: Public scrutiny by global communities accelerates bug fixes, security patches, and code improvements .
- Innovation & Talent: Companies contributing to or releasing OSS (like TensorFlow or React) boost their brand, attract skilled developers, and tap into shared advances.
- Interoperability & Scalability: Open standards and modular licensing prevent lock-in and ease future platform changes .
However, businesses must also navigate challenges: support isn’t automatic (so consider vendor-backed services), choose active and well-governed projects, and understand licensing implications before adoption .
By forging smart open source strategies—engaging with communities, investing in support, and contributing back—companies can accelerate growth, control costs, and stay ahead in an evolving digital landscape.
Original link: https://towardsdatascience.com/why-open-source-is-no-longer-optional-and-how-to-make-it-work-for-your-business/
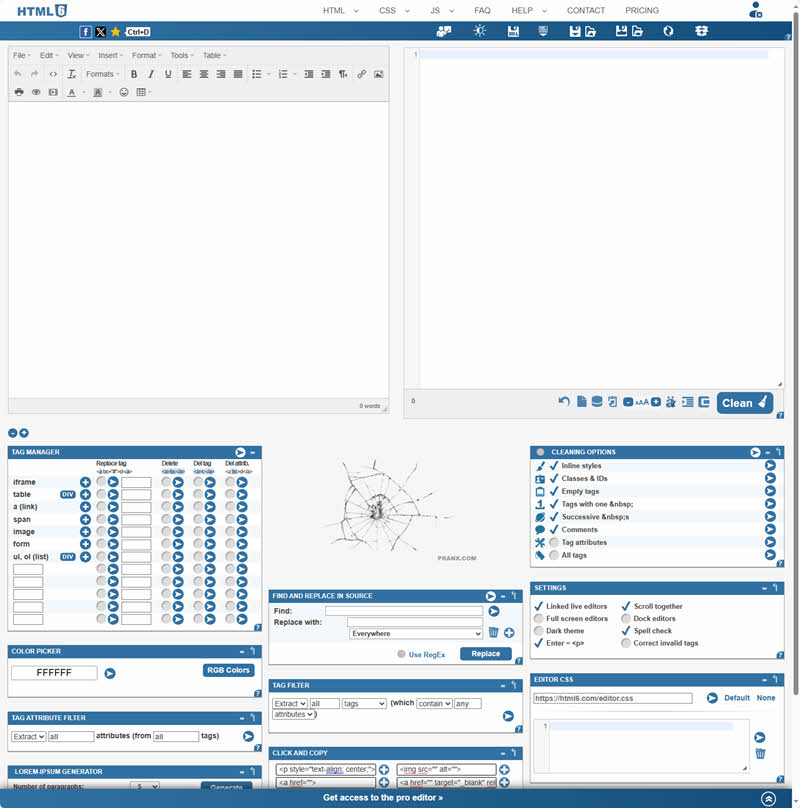
Keeping your HTML tidy is crucial for clean code and better website performance. HTML Cleaner is a free, browser-based tool that helps you remove unwanted tags, inline styles, and messy formatting from your HTML code. It's especially useful when copying content from sources like Microsoft Word or Google Docs, which often include extra markup that clutters your code.
You can paste your HTML, adjust cleaning options (like stripping tags or converting special characters), and instantly get a clean, simplified output. It's fast, easy to use, and doesn't require installation or sign-up — making it ideal for developers, bloggers, and content creators.
Try it here: https://www.innateblogger.com/p/html-cleaner.html
Looking to start coding this year? Travis from Travis Media shares eight essential principles to set you up for success:
- Set a clear goal and timeline: Know what you’re aiming for—whether landing your first job or launching a project—and give yourself deadlines to stay motivated.
- Focus on fundamentals, not trends: Learn core concepts (like data structures, algorithms, debugging) before chasing the latest shiny frameworks.
- Build real projects: Apply what you learn by creating small apps, contributing to open-source, or freelancing to develop practical skills and a portfolio.
- Balance breadth and depth: Start broad to discover what you like, then go deep in one area (web, mobile, data, etc.) to stand out.
- Find a community: Join forums, Discord groups or local meetups for support, feedback, and valuable connections.
- Practice consistently: Daily or weekly coding beats binge sessions—small, steady progress is more effective.
- Embrace failure and feedback: Treat bugs and critiques as learning opportunities, not setbacks.
- Maintain long-term focus: Stay curious, keep learning, and plan for ongoing development beyond your first project or job.
These rules are concise, practical, and beginner‑friendly—packed with insight for anyone starting a coding journey today.
This code removes HTML text nodes that have no non-whitespace content.
foreach (var node in document.DocumentNode
    .DescendantsAndSelf()
    .Where(n => n.NodeType == HtmlNodeType.Text &&
        string.IsNullOrWhiteSpace(n.InnerText)).ToList())
{
    node.Remove();
}
DescendantsAndSelf() will include the root node in the search, which may be necessary depending on the requirements.ToList() to create a separate list for removal, avoiding issues with modifying the collection while iterating
{
    "glossary": {
        "title": "example glossary",
		"GlossDiv": {
            "title": "S",
			"GlossList": {
                "GlossEntry": {
                    "ID": "SGML",
					"SortAs": "SGML",
					"GlossTerm": "Standard Generalized Markup Language",
					"Acronym": "SGML",
					"Abbrev": "ISO 8879:1986",
					"GlossDef": {
                        "para": "A meta-markup language, used to create markup languages such as DocBook.",
						"GlossSeeAlso": ["GML", "XML"]
                    },
					"GlossSee": "markup"
                }
            }
        }
    }
}Customers can now deterministically restrict their workflows to run on a specific set of runners using the names of their runner groups in the runs-on key of their workflow YAML. This prevents the unintended case where your job runs on a runner outside your intended group because the unintended runner shared the same labels as the runners in your intended runner group.
Example of the new syntax to ensure a runner is targeted from your intended runner group:
runs-on:
  group: my-group
  labels: [ self-hosted, label-1 ]
In addition to the workflow file syntax changes, there are also new validation checks for runner groups at the organization level. Organizations will no longer be able to create runner groups using a name that already exists at the enterprise level. A warning banner will display for any existing duplicate runner groups at the organization level. There's no restriction on the creation of runner groups at the enterprise level.
This feature change applies to enterprise plan customers as only enterprise plan customers are able to create runner groups.
Source: GitHub Actions: Restrict workflows to specific runners using runner group names
C# String.StartsWith() method determines whether this string instance starts with the specified character or string.
String.StartsWith(ch)
String.StartsWith(str)
String.StartsWith(str, ignoreCase, culture)
String.StartsWith(str, comparisonType)- .NET
- Agile
- AI
- ASP.NET Core
- Azure
- C#
- Cloud Computing
- CSS
- EF Core
- HTML
- JavaScript
- Microsoft Entra
- PowerShell
- Quotes
- React
- Security
- Software Development
- SQL
- Technology
- Testing
- Visual Studio
- Windows