Successfully added
Windows
by Burton
Disabling Facial Recognition in Windows 10 & 11
Facial recognition, offered through Windows Hello, is convenient for signing in to your Windows device. However, there are scenarios where disabling this feature is preferable, such as privacy concerns, device sharing, or technical issues. This guide outlines three methods to disable facial recognition on Windows 10 and 11.
WindowsHello
FacialRecognition
Windows10
Windows11
Privacy
...see more
The most straightforward method to disable facial recognition is through the Windows Settings:
-
Press
Windows + Ito open Settings. -
Navigate to Accounts > Sign-in options.
-
Under Facial Recognition (Windows Hello), click Remove.
-
Confirm your choice by entering your PIN or password if prompted.
This action removes the facial recognition data associated with your account, disabling the feature for subsequent sign-ins.
...see more
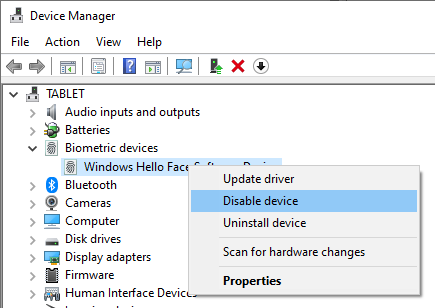
To disable all biometric devices, including facial recognition hardware, follow these steps:
-
Right-click the Start button and select Device Manager.
-
Expand the Biometric Devices section.
-
Right-click on your biometric device (e.g., IR camera) and choose Disable device.
-
Confirm the action when prompted.
Disabling the biometric device prevents the system from using any biometric authentication methods.
...see more
For advanced users, the Windows Registry can be modified to disable biometric features:
-
Press
Windows + R, typeregedit, and press Enter to open the Registry Editor. -
Navigate to:
HKEY_LOCAL_MACHINE\SOFTWARE\Policies\Microsoft\Biometrics. -
If the Biometrics key doesn't exist, create it:
-
Right-click on Microsoft, select New > Key, and name it Biometrics.
-
-
Within the Biometrics key, create a new DWORD (32-bit) value named Enabled.
-
Set the value of Enabled to
0.
Setting this value to 0 disables all biometric features, including facial recognition. To re-enable, change the value back to1.
Referenced in:
Comments